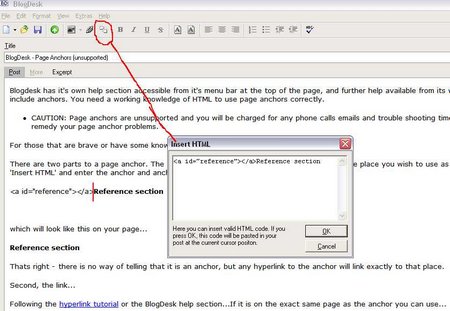
BlogdeskBlogdeskBlogDesk - Page Anchors (unsupported)Blogdesk has it's own help section accessible from it's menu bar at the top of the page, and further help available from its website. None of these include anchors. You need a working knowledge of HTML to use page anchors correctly. For those that are brave or have some knowledge you can give it a go yourself. There are two parts to a page anchor. The first, the anchor itself, with the cursor at exactly the place you wish to use as your anchor, click 'Insert HTML' and enter the anchor and anchor text. e.g:<a id="reference"></a>Reference section
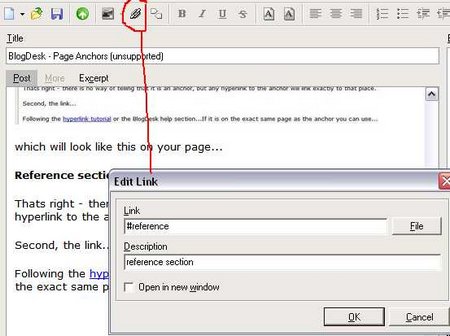
which will look like this on your page... Thats right - there is no way of telling that it is an anchor, but any hyperlink to the anchor will link exactly to that place. Second, the link... Following the hyperlink tutorial or the BlogDesk help section...If it is on the exact same page as the anchor you can use...
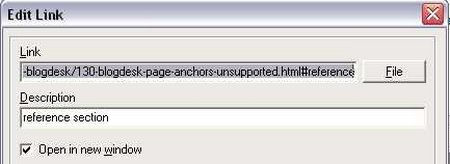
which will look like this on your page... OR.... if it is on a different page you will need something like...
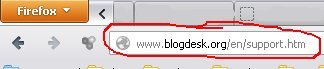
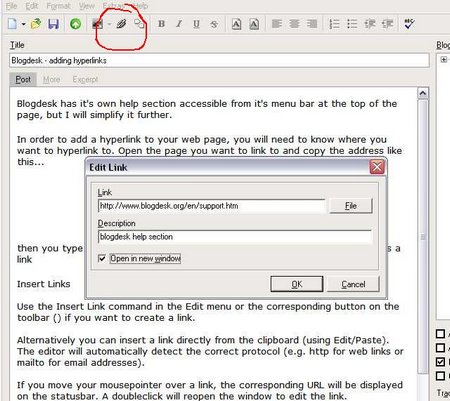
Note: some earlier versions of browsers will not support <a id="top"></a>... and in some cases where backwards compatibility is required I may use <a id="top" name="top"></a>... conversely, the latest HTML5 specification does not recognise <a id="top" name="top"></a>. Note: caution should be taken to ensure the 'id' hasnt been used previously on the same page as it may fail validation. Note: caution should be taken to ensure the 'id' hasnt been used/styled in CSS otherwise anchor text may be styled differently than planned. Blogdesk - adding hyperlinksBlogdesk has it's own help section accessible from it's menu bar at the top of the page, and further help available from its website, but I will simplify it further with some images. In order to add a hyperlink to your web page, you will first need to know where you want to hyperlink to. Open the page you want to link to in your web browser, and copy the address like this...
Raw hyperlinkYou can place it into your page in a raw format by simply pasting the link into your page and Blogdesk will automatically hyperlink it like this... http://www.blogdesk.org/en/support.htm Note: when you pasted the link - Blogdesk automatically added http:// at the beginning of the URL. This is useful if you wish to show the whole link source to your visitor, but it may look messy on your page if the links are big. Masked linkYou can type some text into your page including the words you want to use as hyperlink text, like this... ...you can get help directly from blogdesk here... then highlight the words to use before adding the link... ...you can get help directly from blogdesk here... then in blogdesk, click the link button from the menu bar above (looks like a chain) and paste in the link, add a description, and for any website which is away from your own - always click open in new window
click OK and your text will now be hyperlinked and look like this... ...you can get help directly from blogdesk here... This is a nice clean hyperlink, which has the benefit of a description tag (this benefits search engines and people alike), and it opens in a new window so the visitor can stay on your website. Further help is available in blogdesk help menu - and you should read this for some more important tips. Team viewerBlogdesk - Save and Open PostsYou can save a post with the Save command in the File menu or the corresponding button on the toolbar (button_save). Saving a post is necessary if, before finally publishing it, you want to interrupt your work. By default, BlogDesk will automatically save the current post every 5 minutes. You can deactivate the SmartSave feature in the options dialog. By default, BlogDesk will use the title of the post to automatically build a filename, so you don't need to enter one yourself. You can deactivate the SmartSave feature in the options dialog. You can open a post (draft) using the Open command in the File menu or the correspondig button on the toolbar (button_open). In this Open-Dialog you can also choose a template or a post that has been already published. If you open a Published Post, this post will be read-only. But as soon as you save this post, BlogDesk will create a copy that you can change and republish. Blogdesk - Create new PostsThere are several ways to create a new post: If you did not select any template, BlogDesk will use the default options. Blogdesk - Edit Posts already publishedIt's possible to edit posts that have been already published. This is useful if you want to correct some errors or add some information. Some blog systems / blog hosters do not support this feature or support it in a limited way. If in doubt you have to test it. Do the following if you want to edit a post already published: BlogDesk will now load the post from the server and display it. Whether all orginal categories and options are applied correctly depends of how well the blog system implements this feature. If the post contains images, these remain on the server and are directly linked to. If you republish the post, those images are not uploaded again since they are already on the server. On the other hand, you can't edit those images with the ImageWizard. If you need to edit them, you have to reinsert a local version of the image. Bear in mind that the post keeps the original timestamp so it will show up at the original postion within the blog. Of course you can change the timestamp. If all changes are done, you can publish the revised post. BlogDesk will ask you if you really want to overwrite the original post with the new version. |
Basic WebsiteEasy to useEdit yourself Expandable Professional Responsive Simple Design from only $3349 +annual enquire today... Advanced siteEasy to useEdit yourself Expandable Professional Responsive Custom design from only $5549 +annual enquire today... |